I’ve been using the small Gossen Digisix for some months now, and I’ve been really pleased with this small meter.
It’s small enough that I can carry it around in the pocket of a pair of shorts or jeans. And that’s really a joy. It means that I bring it with me all the time.
However, when carrying it around loosely in my pocket, I tend to accidently press the two red buttons. Now, hitting the Measure button doesn’t harm a lot except it probably uses up some battery. But somehow, I always manage to accidently set the alarm to ring at absurd times, or hit the delayed measuring which will count down for 30 seconds while beeping insistingly from my pocket.
I noticed that I begun using it less and less because of this. So, finally I had it!
I decided to disassemble this small wonder of a light meter and see if I could deactivate the SET button. I don’t need all the rediculous features like alarm, clock, delayed meassuring, and freaking temperature measuring anyway. I just need the M button. In fact, I never even change the iso. I rely on the EV – from this number it’s instantaneous to derive the exposure anyway – I bet it’s easier than manually changing ISO and turning the aperture wheel.
Disassembling the Gossen Digisix light meter
I didn’t really know what to expect when cracking this thing open. But really, this is so easy, that you would be able to do it without reading this manual. So, the manual here is only for your preparations and to give you an idea about what you’re getting into. Once you open the meter, stay calm – and you don’t really need my help 🙂
Unscrew the back of the light meter
First, there are three screws on the back of the meter, that you need to unscrew. When this is done, you can separate the back and front. This is what the meter looks like “inside” with the back removed.
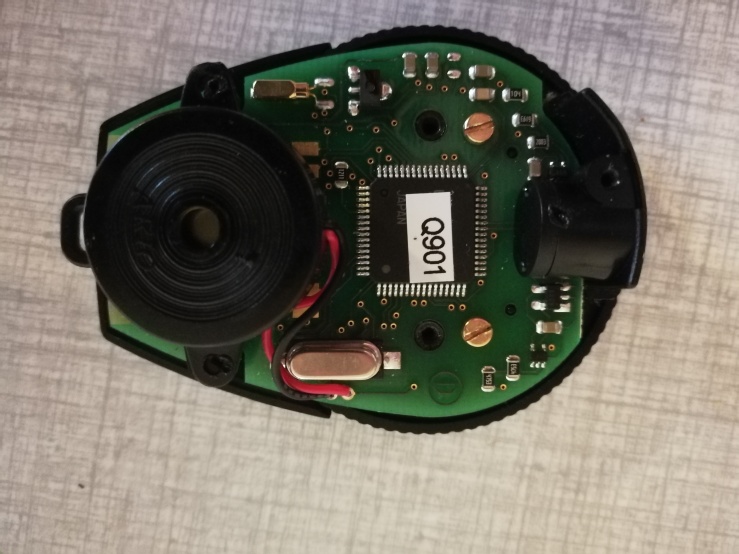
Unmount the green print plate of the light meter
The green plate is mounted on the front of the meter. Therefore, you need to unmount this plate in order to decouple the SET button. Do this by unscrewing the two golden screws that you see in the picture above. There is a third screw hidden under the round black battery compartment that you see to the left in the image. You can gently lift this up to unscrew the third screw.
Now, lift off the green plate, and this is what you’ll have.
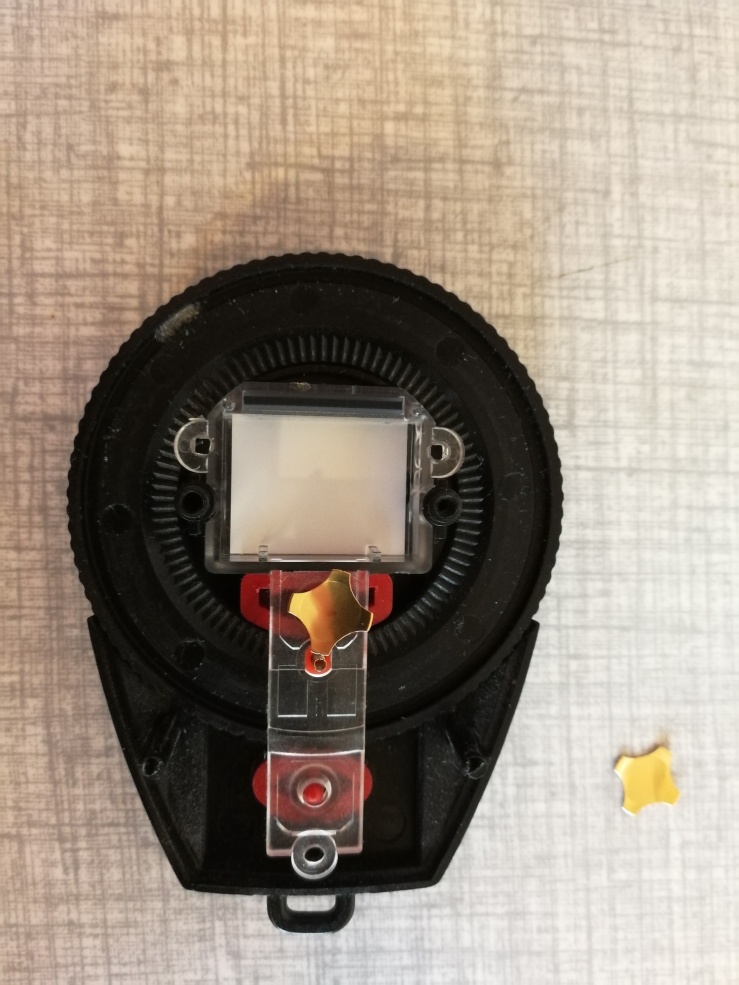
Decouple the SET button
You’ll notice that you have the backside of the two buttons on the meter available here. The top one is the M button, and the bottom one is the SET button. Remove the metal plate from the bottom one, and it will not be able to activate when clicked.
Reassembling the light meter
Alright, now comes the part that takes some time – reassembling. First, if you look at the picture above, the golden plate on the M button needs to be laid back precisely. It needs to be placed like an X – you can almost see how the corners fit into the plastic back. It’s NOT how it is placed on the picture above. I found that the easiest way doing this was to place the metal something like above and then gently shake the meter from side to side until the metal naturally falls into place. Now, while you do this, you must be careful not to loose any of the parts. Most easily lost is the small spring that you’ll see right under the M button, if you look closely on the above picture. This is what makes the small ticks when you turn the “aperture wheel”. If it pops up, you can just put it back in, but it does so fairly easily, so watch out for it!
This is what the Gossen Digisix should look like when things are positioned correctly and without the metal plate for the SET button:

Once you have both the M metal plate and the spring where you want them, gently place the green plate back on top of the whole thing. Now, again this must be done without shaking loose any of the items that you just carefully positioned. I found it most easy to keep a slight and gentle pressure on the plate, and begin by screwing in the screw below the battery compartment (“the third screw”) before I screwed in the two top screws.
After screwing in the third screw, you can put the battery compartment back. This is what you’ll have:

At this point, you can actually test that the aperture ting and M button works. Test the aperture wheel by pressing down the green plate towards the front, and turn the aperture wheel. This should give you the usual click sound. Test the M button by pressing the whole meter towards the table. This should also give a click sound when the button is depressed. If either sound is missing, you probably shook the meter when re-assembling it, bringing some of the pieces out of order. If so, you’ll have to unscrew the green plate again. Do note, though, that the aperture wheel will only get enough resistance to make the ticking noice if you press the green plate against the front when turning the wheel.
Before screwing in the two top screws, take notice that you can actually do this in the wrong holes. There are two set of holes – the top set and the bottom set. The bottom set of wholes are for the screws that go into the back plate. If you screw in these, you won’t be able to get the back plate back on. In the first picture further up, you see the screws correctly screwed in.
Finally, you’ll need to put the back plate back on. Before doing this, make sure that the battery compartment is pressed fully towards the plate so that there is no “air” between the black compartment and the plastic socket:

The last challenge is the light dome.

If you inspect it carefully, you’ll not that the dome itself has two sides where it’s flattened (it’s not entirely circle round). In the picture above this is easiest seen on the top side of the dome. I’m referring to the dome itself, not to the socket. The flat sides should be the ones that slide towards the edges of the casing.

The meter back has a small hole or dent, that you can see on the picture above. This should fit with the small plastic plug of the socket of the dome.
And that’s it. Fit the back back on while positioning the dome correctly, and you will never again wake up in the middle of the neight with your Gossen Digisix ALARM ringing.


